
bloggers normally have some sort of photo editing software installed on their pc. well if they dont, they should.. really. because posting photos on blogs is awesome and makes the blog look a lot less boring. and quit stealing other people's bandwidth and upload your own lah!
these are the basic
Adobe Photoshop knowledge that, in my opinion, is extremely useful for bloggers. and please excuse me but i still use
PhotoshopCS (the first cs not the latest version)
Skill #1 - Croppingdepends on what you want to use the picture for, cropping is a good way to reframe your pic. if u're uploading a profile picture/avatar, it is always good to crop out the access details and focus more on the subject.. your pretty/handsome face.
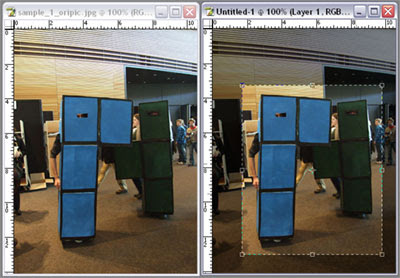 How..
How..- click on the
Crop icon
- click and drag to select the area you wish to keep
- double-click to finish cropping.
Tips.. holding down '
Shift' while selecting the area will keep the selection stay as a box (not rectangle). perfect to make avatar that requires box image (example. 125x125)
Skill #2 - Colour Balance especially scanned images, the images look blueish or (especially old photos) will look yellowish.
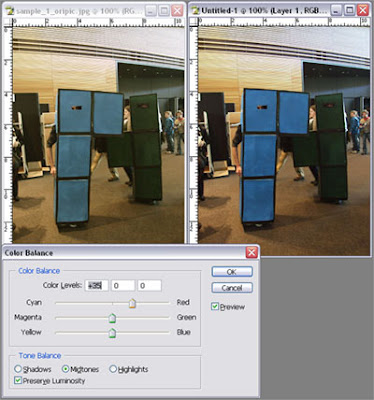 How..
How..- find the
Image>Adjustments>Color Balance... or press '
Ctrl+B'. (could be different in CS4 but i dont have CS4 so i dont know. sorry :P)
- now if the photo is yellowish, drag the slider away from Yellow towards Blue. play around with other colours till u're satisfied with the colour.
Tips..everytime we treat a photo, it is extremely easy to get carried away and ended up a very fake photo instead of a beautiful photo. the trick is to do only subtle treatments and remember, less is more.
Skill #3 - Brightness/Contrast and Levels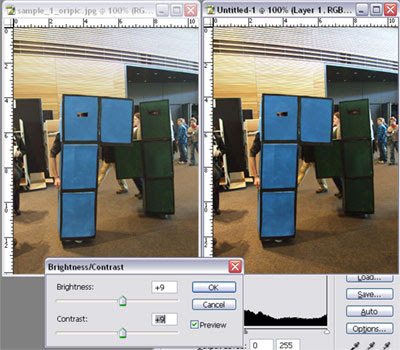 How..
How..to adjust
Brightness/Contrast..- find
Image>Adjustments>Brightness/Contrast...- play around with the two sliders to get your preferred look and feel.
to adjust
Levels- find
Image>Adjustments>Levels.. or just press '
Ctrl+L'.
- adjusting levels is a lot like brightness/contrast. it makes the image bolder and crispier.. if done right, it'll make your image better.
Tips..always remember which part that is black must remain black (not grey) and the details in brighter areas must still be there when u brighten it up.
Skill #4 - Adding Your Watermarkone of the easiest thing to do.. but need a combination of skills to make it look good.
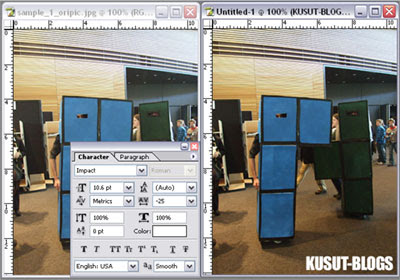 How..
How..- select the
Type Tool (the one to add text) and click on the image,
- type in your watermark (your URL for example).
- press '
Ctrl+Enter' when done..
- edit your text via the
Character Palette.
Tips..fonts play a huge role in making a good looking watermark. find free fonts online.. and find something thats clean and clear. IMO
never use Comic Sans :P. resizing the text with '
Ctrl+T' and drag the selection box would make things easier. and use the change the layer
Blending to
Overlay or
Soft Light or whatever you think looks best.
Skill #5 - Save for Web, Resizingwhen you upload an image, you're uploading images for a monitor display.. not printing purposes. so images that is 1024x768 is already considered huge. larger images will only allow other people to download your image and use it as prints, edit it, whatever.. most of the times without your consent.
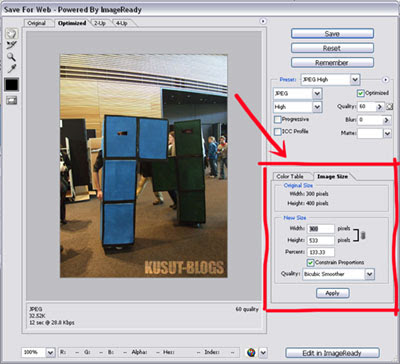 How..
How..to
Save for Web..- go to
File>Save for Web..- a
Save for Web Window will appear. your image will be displayed and above that image are tabs
Original,
Optimized,
2-Up,
4-Up. click on
Optimized.
- select file type in the
Presets drop down menu and select JPEG High (if you want pretty, better quality image) or JPEG Medium (if you dont really need the details).
to
Resize- find the
Image Size tab or the right side
- type in the desired image size. i would always limit the longer length to 1024px. normally images around 600px-ish is sufficient.
- click
Apply when done.
now click on the '
Save' button to finish saving for web. located somewhere on the top-right area of the window.
Tips..always use this to save pictured that you want to upload. it will speed up the loading time of the page. and help you avoid losing readers just because your page loads too slowly or just not 'download efficient'.
Extra Tips..now, every time after you are done editing your image, always ask yourself these questions -
'
did i go too far?'.
'
does it look RTM-ish?' (RTM = malaysian tv1 and tv2. no offence to those stations.. ur content have improved but ur designs are still not so 2000-ish)
have fun ^^


